Sunday, July 25, 2010

Reinitial UCCX 7.0

Sometimes you may want to get back to UCCX initial page. You can do this by the following step.

1. From the UCCX server, Start> Run and type cet. When you get the warning select No.


2. Select com.cisco.crs.cluster.config.AppAdminSetupConfig, then double click in Row 0 and select com.cisco.crs.cluster.config.AppAdminSetupConfig tab and change Setup State from "Done" to "FRESH_INSTALL"


UCCX Initial Configuration

This article is based on UCCX7.0.

After you have installed UCCX, the first thing to do is initial the configuration.

1. Use browser to access http://{UCCX IP Address}/appadmin.


The default login is Administrator, ciscocisco

2. Since this is standalone server I'll use Single Node.


3. Enter CM IP Address that has enabled AXL Service (Normally is Publisher) and user account that has Standard AXL API Access Roles in Callmanager.


4. Upload your license files.


5. Wait for System Components Activation and click next.


6. Enter user and password for Telephony Subsystem and RmCm Subsystem. These users will be created in Callmanager Application User automatically.


 Note:

   6.1 User in Telephony Subsystem is used to control CTI Ports and CTI Route Point in Callmanager.

   6.2 User in RmCm Subsystem is used to control Agent Phones.

7. Enter System Parameters Configuration.


Number of HR session licenses = The maximum sessions that HR client can connect to server

Recording Count = The maximum concurrent on demand recording.

Number of Outbound seats = The number of outbound agent.

Codec = Codec that will be used in UCCX.

8. Select language you want to use (can choose more than 1) and check Country Specific if you want to customize your system audios for that language.


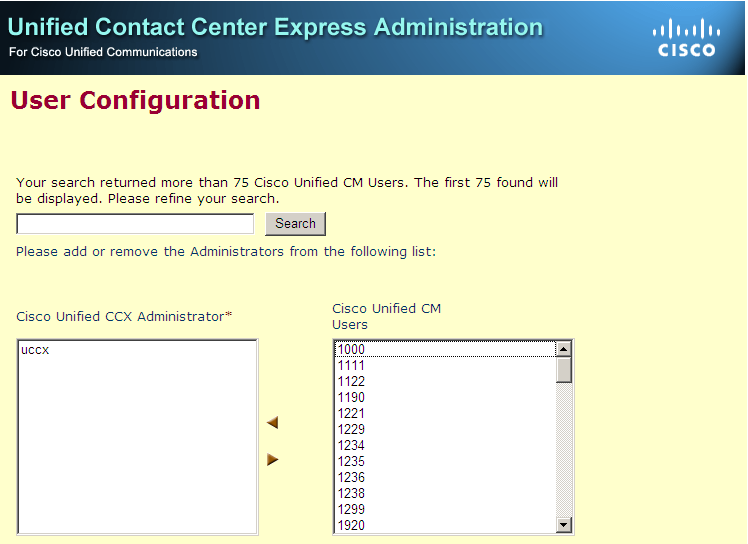
9. Select end user(Sync from Callmanager) to be used as an administrator in UCCX.


10. See Cisco Unified CCX Setup Result Information if these is any error.


Call Detail Records (CDR)

Call Detail Records (CDR) logs call activity in the system and can be sent out or be queried to/from billing application.

Before you begin make sure the following services have been activated.
1. Cisco CAR Web Service  ---> For access CDR details in Publisher web page.
2. Cisco SOAP - CDRonDemand Service  ---> For billing application that query CDR directly from Publisher

Enable Service Parameters

1. Enable CDR in Callmanager Service Parameters (Enable all server in the cluster).


2. If you want to include FAC in CDR, set Display FAC in CDR = True.


To access CDR details in Publisher web page use the following URL.

https://{Publisher IP Address}:8443/car/Logon.jsp

User has to be assigned in Standard CAR Admin Users Group to access this page.
  
To send CDR details to external server using FTP/SFTP.

1. In Cisco Unified Serviceability Page, Select Tools> CDR Management

2. In Billing Application Server Parameters, click Add new

3. Enter IP Address of FTP/SFTP server, account to login that server and Directory Path.


4. If you've got the error message, make sure that server already start FTP/SFTP service.
   

csim start command

csim start {number} is a hidden command to initiate simulated calls. It allows debugging for call routing from voice gateways and CUCME.

When command was issued it will looks into dial-peer configured on the router and send call to destination-pattern configured in dial-peer.

Note that this command also bypass COR configured in dial-peer.

Router#csim start 7101   ---> this case dial-peer was found and success to call

csim: called number = 7101, loop count = 1 ping count = 0

csim err csimDisconnected recvd DISC cid(4885)
csim: loop = 1, failed = 1
csim: call attempted = 1, setup failed = 1, tone failed = 0


Router#csim start 8001   ---> this case dial-peer was not found

csim: called number = 8001, loop count = 1 ping count = 0

csim err:csim_do_test Error peer not found


Remote SPAN (RSPAN) for Voice Recorder

Some Voice Recorders require the copy of signal and RTP from IP Phone to theirs interfaces.

This example will show you how to configure remote span session to send the copy of signal and RTP from IP Phone to Voice Recording Server.


Access Switch Configuration

Access-Switch(config)#vlan 999
Access-Switch(config-vlan)#remote-span
Access-Switch(config-vlan)#exit
Access-Switch(config)#monitor session 1 source vlan 100
Access-Switch(config)#monitor session 1 destination remote vlan 999

Access-Switch(config)#int gi0/1
Access-Switch(config-if)#switchport mode trunk

Core Switch Configuration

Core-Switch(config)#vlan 999
Core-Switch(config-vlan)#remote-span
Core-Switch(config-vlan)#exit
Core-Switch(config)#monitor session 1 source remote vlan 999
Core-Switch(config)#monitor session 1 destination interface gi0/1

Core-Switch(config)#int gi0/3
Core-Switch(config-if)#switchport mode trunk